


Make your own Diabetes-Friendly Home Garden

Why garden?
- It provides stress relief: Folks with both type 1 and type 2 diabetes find incredible stress relief from gardening. It’s private time every day to nourish thoughts and emotional well-being. Gardening can also be a social avenue for stress relief if you join a gardening club or community garden, or if you take friends and family under your wing for a group effort.
- Food becomes more meaningful: You are more invested in the meals you’re creating if you planted the strawberries or tomatoes that are on your plate. You get to enjoy fresh food customized to your preferences.
- The exercise burns calories: Being active is an important part of living with diabetes. Gardening is an opportunity to tailor activity levels to match your needs. For example, if you want to prepare the garden yourself, clearing land for 30 minutes burns about 202 calories for a 180-pound person. Weeding for 30 minutes burns about 182 calories and planting bulbs or seeds burns about 162 calories.
Plants to grow:
Growing Fenugreek
Growing Season:
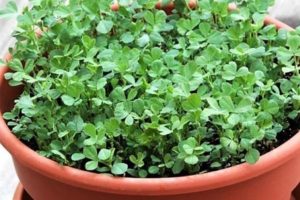
Spring, summer, and fall Sowing the Fenugreek Seeds First you have to buy the fenugreek seeds. Indian grocery Stores keep both the fenugreek powder and seeds. To grow fenugreek plants, buy fenugreek seeds.
- The plant does not like to be transplanted after germination, so the fenugreek seeds should be sown at the final place. Or you can sow seeds (See picture) in biodegradable pots which can be put directly into the ground later on.
- Buy good quality seeds from garden shop or use the seeds from your previous crop. I, however, buy fenugreek seeds from Indian grocery shop, which grow well.
- Sow seeds about 5 mm deep and 50 mm apart in straight line trenches for seed sowing. You can also sow the seeds in criss-cross patterns. In stead of sowing in trenches, you can just sprinkle the seeds on the bed and cover with soil.
- Water well and keep soil well-moistened.
- Seeds will germinate in 3-5 days.
- In the areas of frost, it may be started indoors 5 weeks prior to the last frost of the season. The seedlings can be transplanted outdoors when the soil temperature is around 15°C (60°F).
- I sow seeds every 2-3 weeks in the season, so that when the first set of plants die, I am having the next set to get fresh green methi leaves.
- Tomatoes, beans, strawberries, and kale are all incredibly good and easy for any diabetes-friendly garden. They also help to keep your blood sugar low.
- Fruit trees: Fruit trees such as peach and apple trees are beautiful and fairly simple for anyone to plant. Use these fruits as part of a delicious diabetic-friendly dessert.
- Spices: You want your food to have flavor, of course. Get that special touch when you plant spices or herbs like oregano, parsley, and cilantro.
- More advanced: If you are an experienced gardener or have space and motivation, try more challenging plants such as corn, broccoli, and peppers. They provide more taste, while also controlling your blood sugar levels.
Bitter gourd
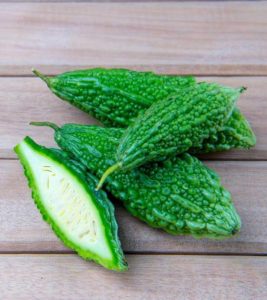
- Find a warm sunny spot on your terrace.
- Use organically rich, sandy or loamy well drained soil. A mixture of cow dung and compost will also do wonders for the plant.
- You can use the bitter gourd seeds from any ripe bitter gourd you picked up from the vegetable market. Just make sure to use only the seeds that are fully formed. You can also use seeds from a previous crop, or buy them from your local nursery. If there is a red coating on the seeds, remove it. If necessary, you can soak the seeds overnight in water before sowing to speed up germination.
- Make holes about half inch deep in the soil and drop the seeds into them. You can leave about 12 inches of space between two holes. Cover the holes with soil and sprinkle some water on top. Sow at least 2 seeds in a pot and use at least 2 pots for sowing the seeds.
Aloevera
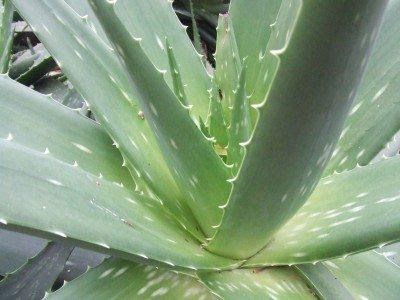
How To Grow Aloe Vera Plants
Aloe vera plants grow best in tropical countries. It is where they originated in the first place. Although they grow best in the tropics, they can still grow in countries where the freezing temperature of winter is ruling. If you are from a tropical country, we suggest that you grow your aloe vera plant outdoors. If you are from a country where winter is ongoing, we suggest you grow the aloe vera plant indoors.
Aloe vera plants do grow faster outside but they can still grow beautifully inside the house. You may eventually grow it outdoors in the warmer months of spring and summer. If it is cold outside, I suggest growing them indoors and follow the proper caring tips.
For your aloe preparation, you will need to prepare a wide pot and a soil mix that is made specifically for succulents. Aloe vera plants love a soil mix that drains well. This might sound challenging, but I’ve found it quite simple to do. You can make a combination of cactus soil, potting soil, and sand.
The pot should also have a large drainage hole. Ideally, the hole should have a diameter of two to three inches. In addition, it is better to have a wide pot than a deep pot so that the roots can spread out.
Collard Leaves
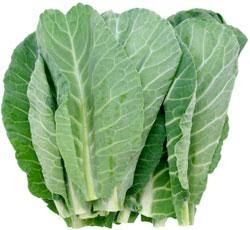 Collards are a good source of niacin that helps to reduce high cholesterol and reduce the threat of getting diabetes. As with most all veggie, collards have a very low glycemic index-slow release carbohydrates and no quick sugar spikes. Studies have shown that type 1 diabetics who consume high-fibre diets have lower blood glucose levels and type 2 diabetics may have improved blood sugar, lipids and insulin levels. One cup of boiled collard greens provides about 8 grams of fibre. The Dietary Guidelines for Americans recommends 21-25 g/day for women and 30-38 g/day for men.
Collard greens also contain an antioxidant known as alpha-lipoic acid, which has been shown to lower glucose levels, increase insulin sensitivity and prevent oxidative stress-induced changes in patients with diabetes. Studies on alpha-lipoic acid have also shown decreases in peripheral neuropathy and/or autonomic neuropathy in diabetics
Curry Leaves
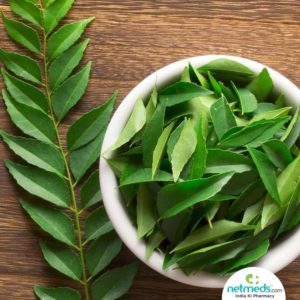
Fill a small pot with a mix of potting soil and compost Look for a small pot that’s about 4–6 inches (10–15 cm) tall and 3–4 inches (7.6–10.2 cm) wide for starting your curry leaf plant. Make a potting mix that’s 60% potting soil and 40% compost so your plant gets enough nutrients while it’s growing. Combine the soil and compost thoroughly until it’s thoroughly mixed together.
- Use store-bought potting soil rather than soil from your yard to ensure that it doesn’t have any harmful bacteria.
- If you live in an area with climate zones 9-12 or the temperature doesn’t fall below 32 °F (0 °C), you can put your curry leaf plant directly in the ground. Make sure to amend the soil so it has the proper nutrients.
- If you want to grow more than 1 curry leaf plant, then prepare multiple pots for each additional plant you want.
Push a curry leaf plant seed 1⁄2 in (1.3 cm) into the potting mix. Push your thumb into the center of the soil so it makes a hole that’s 1⁄2 inch (1.3 cm) deep. Take a single seed for a curry leaf plant and drop it into the hole you just made. Push some of the potting mix back into the hole to cover the seed, and compact it slightly so it’s pressed against the seed.
- You can get curry leaf plant seeds online or from Indian food markets. Get the freshest seeds available for the best chances of them sprout.
Water the soil thoroughly until you see it come out of the drainage holes. After you’ve placed the seed in the soil, use a watering can to wet the soil so the roots can start growing. If there’s standing water on top of the soil, wait for it to absorb deeper before adding more water. As soon as the water starts coming out of the drainage holes at the bottom of the pot, then stop watering the plant.
- Keep the pot inside a shallow container so the soil can absorb any water that drains out from the bottom.
- Be careful not to overwater the seeds since they may not sprout or grow well if there’s too much.
Put the pot in an area that gets at least 6 hours of sunlight per day. After you’ve watered your seeds, set them near a south-facing window so they can get sunlight throughout the day. If you have weather that’s above 32 °F (0 °C), you can also keep the pot outside for the plant to grow. Make sure the plant gets full sun, or 6-8 hours, during the day, or else it won’t produce strong shoots or leaves.
- After about 7 days, you may see your curry leaf plants sprouting out from the soil.
- If the temperature doesn’t drop below 32 °F (0 °C) until the evening, then keep your plant outside during the day and bring it inside at night so it doesn’t freeze or die.